Snowplow

Snowplow is a company based in London that offers a “Behavioral Data Platform” in the cloud and also an open source version. According to the official website, they are the third most used web tracking tool, behind Google Analytics and Facebook.
Motivation for this post
The process of installing and configuring Snowplow Open Source on Google Cloud is quite complex and, to make matters worse, the documentation is very outdated.
The documentation is also open-source, and I have even submitted pull requests to correct some of
the errors I found.
Anyway, I documented everything in this article for future reference.
I hope it helps someone else too.
I went through the whole process between December 2022 and January 2023 using a MacBook Pro M1. For my specific use case, I activated both BigQuery and PostgreSQL, which costs around $240 per month.
Usually, only one Data Warehouse is used. In GCP, I recommend BigQuery because:
- It handles large volumes of data well
- Some packages from dbt, like snowplow_ecommerce, are not yet compatible with PostgreSQL.
- It can cost less, depending on usage (even with extra Pub/Sub)
- BigQuery is charged based on usage, not on online time.
- The first terabyte of storage is free.
Overview
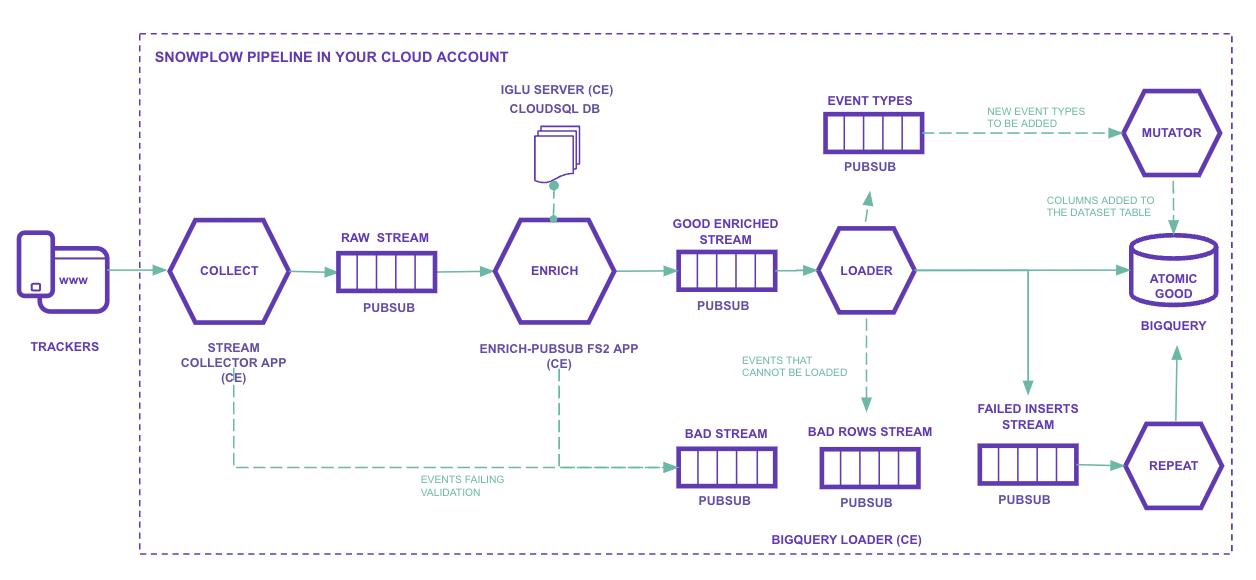
Explaining the image item by item:
- Trackers: This is where we want to collect information from.
It is possible to track anything capable of making REST calls, such as websites, mobile apps, and databases.
The SDKs help a lot in this process.
The data is sent following an explicit schema that you define yourself. - Iglu Server: Cloud Engine (with load balancer) and Cloud SQL database.
It is a schema repository.
Schemas are defined in JSON Schema files and can be versioned, for example: YouTube JSON Schema and GA Ecommerce Schema. - Stream collector app: Compute Engine (with load balancer).
It contains the HTTP endpoint that receives raw events, serializes them, and sends them to Pub/Sub topics (sp-raw-topicorsp-bad-1-topic).
If the event is too large, for example, it is sent to the bad data PubSub topic.
Enrich PubSub: JVM application on Compute Engine (one or more VMs).
At this stage, events from the Raw Stream (sp-raw-topic, written by the collector) are read and validated.- If the event does not match a schema defined in the Iglu Server, this event is sent to the Bad
Stream.
This prevents false or poor quality data from going into production and also allows analyzing the received schema, which helps to find possible errors.
In Google Analytics, this data would simply be ignored. - If the event matches a schema, it will be “enriched” according to what you configured.
For example:- Split the User Agent into parts:
- Device type
- Operating system
- System version
- etc.
- Anonymize IPs
- Filter personal data (PII)
- Extend geolocation information
- Split the User Agent into parts:
There are several enrichments available.
Once “enriched”, the event is sent to the Good Enriched topic (
sp-enriched-topic).- If the event does not match a schema defined in the Iglu Server, this event is sent to the Bad
Stream.
Loader: loads into tables
If the loader is unable to insert rows into BigQuery, they are sent to a stream of failed inserts and the insertion is attempted again.Mutator: Is used when some schema needs to be changed or extended. All events go to the same giant table. Changing a schema can cause a big problem.
Terraform
Instead of creating and configuring each resource manually through the Google Cloud interface or the command line, with Terraform you define, declaratively, the infrastructure as code in a specific language based on HCL (HashiCorp Configuration Language).
Like any code, Terraform files can be versioned, which makes it easier to make modifications and rollbacks.
There is a Quick Start that deploys using Terraform. Unfortunately, the current modules do not cover all setups, and some of them are quite outdated. Still, I will use them as a base because Terraform reduces the risk of errors and makes it easier to maintain the infrastructure.
Prerequisites
Creating a project
Create a project on Google Cloud and activate billing. I will use the name
snowplow-projectin this article.Installing Terraform
brew install terraformInstalling Google Cloud CLI
brew install google-cloud-sdk$ gcloud version Google Cloud SDK 412.0.0 bq 2.0.83 core 2022.12.09 gcloud-crc32c 1.0.0 gsutil 5.17gcloud auth loginAdd to
~/.zshrc:source "$(brew --prefix)/Caskroom/google-cloud-sdk/latest/google-cloud-sdk/path.zsh.incThis command will add the directory
/opt/homebrew/Caskroom/google-cloud-sdk/latest/google-cloud-sdk/binto the PATH.Service account
Create a service account named
spsetupMenu » IAM and admin » Service accounts » Create Service AccountCreate a key
KEYS » Add Key » Key type: JSON
Save the file as~/Snowplow/key.jsonPoint the environment variable to the file path
export GOOGLE_APPLICATION_CREDENTIALS="/Users/julio/Snowplow/key.json"
Activating APIs
Go to each of the links below and activate the APIs.
VPC and Subnets
The “secure” configuration of Snowplow requires a VPC. It can be created through the web interface, command line, or Terraform.
Through the command line:
gcloud compute networks create \
    vpc-snowplow \
    --project=projeto-snowplow \
    --description=Snowplow\ VPC \
    --subnet-mode=custom \
    --mtu=1460 \
    --bgp-routing-mode=regional
gcloud compute networks subnets create \ vpc-snowplow-europe-west3 \ --project=projeto-snowplow \ --range=10.0.0.0/24 \ --stack-type=IPV4_ONLY \ --network=vpc-snowplow \ --region=europe-west3 \ --enable-private-ip-google-accessThrough Terraform:
# VPC
# https://www.terraform.io/docs/providers/google/r/compute_network.html
# Keep the default route (0.0.0.0/0) to allow internet access
resource "google_compute_network" "snowplow_vpc" {
  name                            = "snowplow-vpc"
  routing_mode                    = "REGIONAL"
  auto_create_subnetworks         = false
  delete_default_routes_on_create = false
}
# Private Subnet # https://www.terraform.io/docs/providers/google/r/compute_subnetwork.html resource "google_compute_subnetwork" "snowplow_private_subnet" { name = "snowplow-private-subnet-europe-west3" ip_cidr_range = "10.0.0.0/24" region = var.region network = google_compute_network.snowplow_vpc.id private_ip_google_access = true }
Cloud Router
Through the command line:
gcloud compute routers create router-snowplow \
--project=projeto-snowplow \
--description=To\ allow\ access\ to\ the\ internet \
--region=europe-west3 \
--network=vpc-snowplow \
--set-advertisement-mode=custom
Through Terraform:
# Cloud Router
# https://www.terraform.io/docs/providers/google/r/compute_router.html
resource "google_compute_router" "snowplow_router" {
  name    = "snowplow-router"
  region  = var.region
  network = google_compute_network.snowplow_vpc.id
  bgp {
    asn            = 64514
    advertise_mode = "CUSTOM"
  }
}
Cloud NAT
Create a NAT gateway. This is how VMs will have internet access.
Through Terraform:
# NAT Gateway
# https://www.terraform.io/docs/providers/google/r/compute_router_nat.html
resource "google_compute_router_nat" "snowplow_nat" {
  name                               = "snowplow-nat"
  router                             = google_compute_router.snowplow_router.name
  region                             = google_compute_router.snowplow_router.region
  nat_ip_allocate_option             = "AUTO_ONLY"
  source_subnetwork_ip_ranges_to_nat = "LIST_OF_SUBNETWORKS"

  subnetwork {
    name                    = google_compute_subnetwork.snowplow_private_subnet.id
    source_ip_ranges_to_nat = ["ALL_IP_RANGES"]
  }

  log_config {
    enable = true
    filter = "ERRORS_ONLY"
  }
}
Java
brew install java
brew install openjdk
sudo ln -sfn \ $(brew --prefix)/opt/openjdk@11/libexec/openjdk.jdk \ /Library/Java/JavaVirtualMachines/openjdk-11.jdkIgluctl
Copy the link of the latest version available at https://github.com/snowplow/igluctl/releases/latest.
wget https://github.com/snowplow/igluctl/releases/download/0.10.2/igluctl_0.10.2.zip
unzip igluctl_0.10.2.zip
rm igluctl_0.10.2.zip
chmod +x igluctl mv igluctl ~/binigluctl --version 0.10.2Move the executable to a directory in the PATH.
~/binin my case.
Quick Start
Repository
Clone the repository
git clone https://github.com/snowplow/quickstart-examplesProject Folder
Copy only what will be used to a new folder:
cp -r quickstart-examples/terraform/gcp/iglu_server/secure ~/Snowplow/iglu_server
cp -r quickstart-examples/terraform/gcp/pipeline/secure ~/Snowplow/pipeline
I copied only the
securefolders, as it is recommended for production environments. The difference is that Snowplow will be configured in the VPC we created earlier.
Iglu Server
terraform.tfvars File
Edit the file
~/Snowplow/iglu_server/terraform.tfvars:prefix = "sp" project_id = "projeto-snowplow" region = "europe-west3" network = "snowplow-vpc" subnetwork = "snowplow-private-subnet-europe-west3" ssh_ip_allowlist = ["88.217.100.200/32", "35.235.240.0/20"] ssh_key_pairs = [ { user_name = "snowplow" public_key = "ssh-ed25519 AAAAC3NzC1lZDI…E5Gv8/gQzPr3H/9B+Nxc/GInziPJX" } ] # --- Snowplow Iglu Server iglu_db_name = "iglu" iglu_db_username = "iglu" iglu_db_password = "SENHA_DO_IGLU_BD" iglu_super_api_key = "01234567-890a-bcde-f012-34567890abcd" user_provided_id = "" telemetry_enabled = false # --- SSL Configuration (optional) ssl_information = { certificate_id = "" enabled = false } # --- Extra Labels to append to created resources (optional) labels = {}To generate the SSH key:
ssh-keygen -t rsa -b 4096 -f snowplow -C "Snowplow"To generate a random UUID: https://duckduckgo.com/?q=uuid
Terraform Commands
cd ~/Snowplow/iglu_server
terraform init
terraform plan -out plan
terraform apply "plan"
Make a note of the output, which will be the Iglu Server IP.
The output is also saved in theterraform.tfstate:$ grep -A1 iglu_server_ip_address terraform.tfstate "iglu_server_ip_address": { "value": "34.100.100.200",Add schemas to the Iglu server
git clone https://github.com/snowplow/iglu-central
cp -r iglu-central/schemas ~/Snowplow/
rm -rf iglu-central
cd ~/Snowplow rm -rf schemas/UNUSED_SCHEMAS igluctl static push --public schemas/ http://IGLU_SERVER_IP 01234567-890a-bcde-f012-34567890abcdKeep only the schemas you will use in the
schemasfolder.
The UUID at the end of the command is theiglu_super_api_keywe generated earlier.Inspect Iglu Server status
The Iglu Server has some endpoints to inspect its own state.
$ curl http://34.100.100.200/api/meta/health/db
OK
$ curl -s http://34.100.100.200/api/meta/server \ -H "apikey: 01234567-890a-bcde-f012-34567890abcd" | jq { "version": "0.8.7", "authInfo": { "vendor": "", "schema": "CREATE_VENDOR", "key": [ "CREATE", "DELETE" ] }, "database": "postgres", "schemaCount": 0, "debug": false, "patchesAllowed": true }
Pipeline
File
bigquery.terraform.tfvarsEdit the file
~/Snowplow/pipeline/bigquery.terraform.tfvars:prefix = "sp" project_id = "projeto-snowplow" region = "europe-west3" network = "snowplow-vpc" subnetwork = "snowplow-private-subnet-europe-west3" ssh_ip_allowlist = ["88.217.100.200/32", "35.235.240.0/20"] ssh_key_pairs = [ { user_name = "snowplow" public_key = "ssh-ed25519 AAAAC3NzC1lZDI…E5Gv8/gQzPr3H/9B+Nxc/GInziPJX" } ] iglu_server_dns_name = "http://34.100.100.200" iglu_super_api_key = "01234567-890a-bcde-f012-34567890abcd" bigquery_db_enabled = true bigquery_loader_dead_letter_bucket_deploy = true bigquery_loader_dead_letter_bucket_name = "sp-bq-loader-dead-letter_bucket" user_provided_id = "" telemetry_enabled = false ssl_information = { certificate_id = "" enabled = false } labels = {} ########################################################################### postgres_db_enabled = true postgres_db_name = "snowplow" postgres_db_username = "snowplow" postgres_db_password = "TYPE_PG_PASSWORD_HERE" postgres_db_authorized_networks = [ { name = "julio" value = "88.217.100.200/32" } ] postgres_db_tier = "db-g1-small"Terraform Execution
cd ~/Snowplow/pipeline
terraform init
terraform apply
Test Events
Get the collector’s address:
$ grep -A1 collector_ip_address terraform.tfstate
    "collector_ip_address": {
      "value": "34.111.120.123",
Send the following test events:
curl 'http://34.111.120.123/com.snowplowanalytics.snowplow/tp2' \
   -H 'Content-Type: application/json; charset=UTF-8' \
   -H 'Cookie: _sp=305902ac-8d59-479c-ad4c-82d4a2e6bb9c' \
   --data-raw \
  '{
    "schema": "iglu:com.snowplowanalytics.snowplow/payload_data/jsonschema/1-0-4",
    "data": [
      {
        "e": "pv",
        "url": "/docs/open-source-quick-start/quick-start-installation-guide-on-aws/send-test-events-to-your-pipeline/",
        "page": "Send test events to your pipeline - Snowplow Docs",
        "refr": "https://docs.snowplow.io/",
        "tv": "js-2.17.2",
        "tna": "spExample",
        "aid": "docs-example",
        "p": "web",
        "tz": "Europe/London",
        "lang": "en-GB",
        "cs": "UTF-8",
        "res": "3440x1440",
        "cd": "24",
        "cookie": "1",
        "eid": "4e35e8c6-03c4-4c17-8202-80de5bd9d953",
        "dtm": "1626182778191",
        "cx": "eyJzY2hlbWEiOiJpZ2x1Om…YS03ZjRlNzk2OTM3ZmEifX1dfQ",
        "vp": "863x1299",
        "ds": "848x5315",
        "vid": "3",
        "sid": "87c18fc8-2055-4ec4-8ad6-fff64081c2f3",
        "duid": "5f06dbb0-a893-472b-b61a-7844032ab3d6",
        "stm": "1626182778194"
      },
      {
        "e": "ue",
        "ue_px": "eyJzY2hlbWEiOiJpZ2x1Om…IlB1cnBsZSBTbm93cGxvdyBIb29kaWUifX19",
        "tv": "js-2.17.2",
        "tna": "spExample",
        "aid": "docs-example",
        "p": "web",
        "tz": "Europe/London",
        "lang": "en-GB",
        "cs": "UTF-8",
        "res": "3440x1440",
        "cd": "24",
        "cookie": "1",
        "eid": "542a79d3-a3b8-421c-99d6-543ff140a56a",
        "dtm": "1626182778193",
        "cx": "eyJzY2hlbWEiOiJpZ2x1Om…lNzk2OTM3ZmEifX1dfQ",
        "vp": "863x1299",
        "ds": "848x5315",
        "vid": "3",
        "sid": "87c18fc8-2055-4ec4-8ad6-fff64081c2f3",
        "duid": "5f06dbb0-a893-472b-b61a-7844032ab3d6",
        "refr": "https://docs.snowplow.io/",
        "url": "/docs/open-source-quick-start/quick-start-installation-guide-on-aws/send-test-events-to-your-pipeline/",
        "stm": "1626182778194"
      }
    ]
  }'
The above command sends one event that is good and one that does not match any schema.
BigQuery Verification
Go to https://console.cloud.google.com/bigquery?project=projeto-snowplow and find the table
eventsin the datasetsp_snowplow_db. Check if there is any data in thePREVIEWtab.This is the table for “good data”.
The pipeline for “bad data” is not included in the Quick Start and must be created manually.
PostgreSQL Verification
Get the database’s IP:
$ grep -A1 postgres_db_ip_address terraform.tfstate
  "postgres_db_ip_address": {
    "value": "34.89.100.100",
Connect using a program like DBeaver:
Host:34.89.100.100Database:snowplowPort:5432Username:snowplowPassword:TYPE_PG_PASSWORD_HERE
The table for “good data” is
atomic.events.
It should be empty as the queue has already been consumed by BigQuery.
It is necessary to duplicate the queue so that PostgreSQL also receives the events.There are several tables for “bad data”, one of them is
atomic_bad.com_snowplowanalytics_snowplow_badrows_schema_violations_1.
Next Steps
- Configure domain and enable SSL
- Create custom schemas
- Bad data in BigQuery
Links

I’m a Brazilian computer engineer based in Germany, passionate about tech, science, photography, and languages.
I’ve been programming for about two decades already, exploring everything from mobile apps and web development to machine learning. These days I focus on cloud SRE and data engineering.
I volunteer in the open source and Python communities, helping organize PyCon DE and PyData Berlin, mentoring, and contributing with code and translations.
On my blog, I share Linux tips, setup guides, and personal notes I’ve written for future reference. I hope others find them helpful as well. The content is available in multiple languages.
Browse my gallery for some of my photography.
Away from the keyboard, you’ll find me at concerts, playing clarinet, cycling, scuba diving, or exploring new places, cultures, and cuisines.
Always happy to connect! 🙂